Tart of Darkness Experiment

>> Sunday, December 22, 2013

As I indicated in a previous post, my brew club recently did a Tart of Darkness clone barrel project. That brew will spend the next 6-12 months in the barrel where bacteria and brett are working away on turning it into a nice sour stout.

Today I'm kicking off an experiment to see if I can do a speedy version of the same beer using the technique that I used for my Berliner Weisse back in April. The BW ended up being one of my favorite brews I've ever made and it finished much faster than most sours so I'm hoping this turns out as well.

The basic process is pitch a lacto starter and give it a seven day head start on the yeast. After seven days I'll pitch Roeselare. I'm hoping to have a decent sour in a couple months. That said, since Roeselare contains pedio, there is a chance this beer could get sick/ropey. If that happens, it'll take a bit longer for this beer to be ready...could be six months or more. Brewing is all about experimenting, so this will be fun even if it doesn't go exactly like I'm hoping it will.

I'm using the same recipe from our brew club except I'll be using aged hops so my IBUs will be close to zero. Another difference, I'm not going to toast the flaked oats like I did for the group brew. Also, I'm not mashing with the flaked oats; instead they'll go in the mash tun at the beginning of the sparge (after mashout). The reason for this is I'm trying to ensure I get some complex starches into the beer for the brett to work on. Lastly, I'm mashing at 155F instead of 158F.

8# 6.9oz Rarh Pale Malt
14 oz Briess Crystal 60L
14 oz Flaked Oats (steep in BK)
6.7 oz Briess Roasted Barley
5.1 oz Briess Chocolate Malt
28.3g Aged debittered hops (60 min)
1 package Wyeast 5335 Lactobacillus in 1L starter
1 package Wyeast 3763 Roeselare after 7 days
1/2t Wyeast Yeast Nutrient
Oak cubes in secondary

Mash at 155F for 60 min. 90 min boil. Ferment at 68F


Update 12/27/2013
The brew session went well back on 12/22; no issues, hit the target gravity, pitched at 66F and warmed to 68F overnight. That said, I might have an issue with this beer. The picture of my Berliner Weisse from April shows a nice krausen within 24 hours of pitching. After five days, I still haven't seen any sign of a krausen in the ToD Experiment. This has me a little worried. It's too early to panic, but I think I'll pull a sample before pitching the Roeselare to check the gravity and see how it's progressing. I tasted the starter wort before pitching and it had the same light lemony tartness as the BW starter. The aroma was a little bit different on this one...kind of musty but not smelling like dirty feet or anything like that.

Update 12/30/2013
So some sad news today, I checked on this brew and there were tiny spots of mold starting to grow on top. It never showed any signs of krausen from pitching the lacto. It was definitely mold and not a pellicle. I suspect I got a bad/mishandled lacto culture with limited viability. So essentially the lacto cell count was lower than expected which allowed the mold to take hold and start growing. There was a slight gravity change but there is no detectable sour aroma and only a very, very subtle tartness in the flavor. It was so subtle that I probably wouldn't have noticed it if I wasn't looking for it. I've never had mold before. I decided to go ahead and rack from under the the mold rafts and pitch the Roeselare to see what happens. Best case scenario, I'm probably looking at 6-12 months for it to finish; worst case, this will be a dumper.

Update 12/31/2013
Better news today, as usual the Roeselare has taken off like crazy. I added a blowoff this morning to hopefully avoid making a mess. I've heard people comment that Roeselare is a slow starter. I've only experienced that once and I think that was because it was an older sample (6+ months). Every other time I've used it, it has been very active within 24 hours of pitching. It usually calms down after a few days then gets fairly active again after a couple weeks then slows down again for the long haul.

Update 1/12/2014
This one is still slowly chugging along. There are no signs of mold now. The aroma out of the airlock is hints of sourness and malt. I'm looking forward to doing a side by side comparison to the group brew some day.

Update 1/7/2015
I pulled a sample today. This one turned out well with some nice chocolate notes to accompany the mild tartness. It's definitely not as complex as the club version that went into the barrel, but it's pretty good. I think I may add some bourbon soaked oak cubes to try to give it a bit more complexity.

Update 6/2/2015
I added bourbon soaked oak cubes a while back but this beer is still lacking a lot of complexity compared to the group version. Sourness level is fairly low as well. Not a bad beer but knowing how good the group version turned out, this one pales in comparison.

Read more...

Red Sauce for Pork Tamales

I love Mexican food and one of my favorite things is pork tamales. I  haven't ever gotten around to making my own tamales from scratch...basically because it's a really long process and I haven't been able to talk my wife into helping me do it. The pork tamales available at Costco are really good (Del Real Foods brand), so I'll have to be satisfied with them for the time being.

What I did decide to do was make up some traditional red sauce from scratch to go with my store-bought tamales. Prep time is a little over an hour, but it's really good and really easy to make. This sauce is a great compliment to tamales and I suspect it could also be really good with some huevos rancheros-style eggs.

Ingredients
15 large dried chilies (I used Guajillo)
5 garlic cloves
2 teaspoons ground cumin
1 teaspoon kosher salt
2 teaspoons all-purpose flour
2 teaspoons olive oil

Directions
Pre-heat oven to 350.
Remove stems then split peppers in half to remove seeds. Cooking shears work well for this.
Place peppers in a single layer on a cookie sheet and roast in the oven for 2-3 minutes.
Remove peppers from the oven, place them in a bowl and cover with hot water. Soak them for about 30 minutes.
Transfer peppers, garlic, cumin, salt and about 2.5c of the pepper water to your blender. Blend until smooth.
Next we need to make a roux. Add oil to a 2 quart sauce pan over medium heat. Add flour while stirring and cook until browned. Be sure to stir constantly so as not to burn the flour.
Once the flour is browned, carefully stir in the blended pepper mixture. You might want to pour it through a coarse sieve while adding it to the sauce pan. This will help filter out any small bits of pepper skin, but it's not required.
Simmer uncovered for about 10 minutes then serve over tamales and enjoy.

Read more...

Brined Smoked Turkey

>> Monday, November 25, 2013

Just in time for Thanksgiving, this brine works great for smoking whole turkeys, turkey breasts, and chicken. Brines are great for smoking because they add lots of flavor and help ensure the meat doesn't dry out. I'm not sure of the original source for this recipe, but it's posted on quite a few different recipe sites. I found it a few years ago and it's definitely a crowd favorite. Smaller birds are easier to smoke in a reasonable amount of time, so I'd recommend going with something around 16 pounds or smaller.

Ingredients
2 gallons cold water (see directions below)
1.5 c canning salt *See update below
3 T minced garlic
1 T ground black pepper (preferably freshly ground)
1/4 c Worcestershire sauce
1/3 c dark brown sugar, packed

Directions
24 to 48 hours before smoking, mix all ingredients in a container large enough to hold your turkey. I usually start off with about a gallon of water, add the turkey, then top off with enough water to cover the bird. I tend to go for about 24 hours on mine. Too long in the brine can make the bird too salty. You want the bird to be completely submerged in the brine, so I usually weigh it down with a dinner plate. It probably goes without saying, but put it in the fridge for 24-48 hours.

About an hour before you plan to smoke it, remove the bird from the brine and rinse it with cold water. Pat dry and leave the bird on a wire rack and allow it to come to room temp. That's about all there is to it.  Sometimes I will add a dry rub, but it's not necessary as the bird will have plenty of flavor from the brine. Also, don't stuff it. Smoke with your favorite wood; I usually go with hickory but this year I'm trying a blend of hickory along with some oak from whiskey barrel staves. Smoke until done (breast temp of 160F).

Speaking of temp, in the past I've always smoked the turkey at 225F but this year I'm going to try 325F. That may seem really high, especially to those used to smoking brisket or pork shoulders, but keep in mind turkeys aren't chock full of collagen and connective tissues that benefit from low and slow cooking like some of those other cuts of meat. At a temp of 325F we should get some of the same maillard reactions that we get when brewing beer. It also allows the skin to crisp up which simply won't happen at 225F.

Update 11/29/2013
I used this recipe on a boneless turkey breast yesterday. I put the breast in the brine Tuesday evening and pulled it out Thursday around noon. This is the longest I've tried brining and it ended up being a bit too salty for me. Next time I will brine for a shorter period of time, or reduce the amount of salt, or a little of both. I like the idea of giving the other flavors more time to work their way into the meat, so I might just try cutting the salt in half. Cooking at 325F and removing when the breast hit 160F worked out great. The combination of hickory and oak also worked well.

Update 12/30/2013
I used this brine again a few days ago. I picked up a Cabela's meat slicer over the holidays to use for slicing homemade bacon as well as things like turkey breast for lunch meat. I made this brine again and used it on chicken and turkey breast. I was out of pickling salt so I went with kosher salt. I used about 3/4 cup and brined for 48 hours. This worked out great, so I'd suggest cutting the salt in half if you intend to brine it for more than 24 hours.
Before smoking
Mmmm, hickory and oak smoke

Read more...

Sour Beers Update

>> Friday, November 22, 2013

I was going to try to keg my Smoked Robust Porter today but it still had quite a bit of krausen, probably because I fermented it fairly cool. I decided to go ahead and give it another week in the fermenter, so hopefully it and the Peppermint Chocolate Stout will be ready to keg next weekend.

In the meantime, I figured I'd post an update on three of the sours I have going. All of these sours have been aging in my basement utility room. Their ages currently range from about 8 to 14 months.

Oud Bruin
First up is the Oud Bruin at 14 months. This is the only beer out of the three that wasn't fermented with Roeselare. Instead I used White Labs WLP665 Flemish Ale Blend. From the description I surmised this blend is the White Labs equivalent of Wyeast's Roeselare. However, it did develop quite a bit different than other sours where I've used Roeselare. This beer still has a pellicle but I think it's about ready to go. It has a maltier backbone than most of the other sours I've made. I'd say it's more tart than some of the commercial Oud Bruins I've tried, but I haven't had many. It has a bit of pie cherry character combined with dark fruits. Aroma is malt and fruity acidity. Tartness level is good but less than my Flanders Reds and my Berliner Weisse. Current gravity reading on the refractometer is 10.6P. Adjusting for refraction error, that puts it at about 1.001. I forgot that I hadn't adjusted this recipe for my system efficiency, so the O.G. was higher than expected. This is kind of an imperial Oud Bruin. My pH test strips put the pH at about 3.8.

Flanders Red #3
Next up is Flanders Red #3, at just over 12 months. This version was a different recipe than the first two versions. Color-wise it's closer to orange than red. It has less malt in the nose and on the palate. The focus here is on tartness, pie cherries pie cherries and more pie cherries. Current gravity reading on the refractometer is 9.4P. Adjusting for refraction error, that puts it at about 1.013. My pH test strips put the pH in the 3.0-3.2 range. This beer still has a pellicle so I think I'll leave it a bit longer and see what happens.

Lambic
Last up is the 8 month old lambic, my first attempt at a Lambic style sour. This is the youngest of the three. There is quite a bit of sourness in the nose of this beer, but it also has a different barnyard funkiness lacking in the Flanders Red #3; odd because both used Roeselare. It's sharply sour but the tartness level seems less than the Flanders Red. The sharpness will likely mellow with age. The wheat also comes through in the aftertaste similar to my Berliner Weisse. The body is the lightest of the three. Current gravity reading on the refractometer is 7.8P. Adjusting for refraction error, that puts it at about 1.009. My pH test strips put the pH in the 3.4-3.6 range.

Read more...

Peppermint Chocolate Stout

>> Sunday, November 10, 2013

Trying to keep the pipeline going, so today I'm brewing a beer that I'm hoping will be a wintertime pleaser, a Peppermint Chocolate Stout. This recipe is based on Andes Mint Chocolate Stout posted on homebrewtalk.com by modernlifeisANDY.

I've been wanting to try a mint chocolate stout and this one kind of jumped out at me when I was perusing the recipe database on HBT. Mint and chocolate are an awesome combination in things like candy and ice cream. I'm hoping it will turn out to be a great combination in this beer too. I've never had a mint chocolate stout, so I'm kind of going in blind on this one. I figure I'm either going to love it or hate it. On the up side, the recipe has quite a few good reviews on HBT so I'm hoping for the best.

Here's the recipe as I'm making it

8# Crisp Maris Otter
1# Flaked Barley
8 oz Weyermann Carafa II
8 oz Briess Caramel 40L
8 oz Dingemans Chocolate
2.0 oz EK Goldings (60 min)
10 Celestial Seasonings Peppermint tea bags (10 min)
4 oz Hershey's Unsweetened Cocoa powder (5 min)
Wyeast 1084 Irish Ale Yeast in 1L starter
1t Vanilla extract at kegging (or to taste)

Mash at 156F for 60 minutes. Ferment at 62F.

Brewing Notes
I wanted to note, the purpose of the vanilla extract is to help bring out the chocolate notes. You don't want to add so much that it turns into a vanilla peppermint chocolate stout, so I'm going to start off with 1 teaspoon and go from there.


Update 12/4/2013
I kegged this last weekend. I ended up going with 2 teaspoons of Watkins pure vanilla into about 4.8 gallons of beer. That amount seemed to enhance the chocolate notes without standing out. The peppermint was noticeable in the flavor and aroma. Looking forward to trying it after it's carbed.

Update 1/6/2014
This has been in the keg for a little while now. It's not my favorite beer, but it's not horrible. The peppermint is a bit strong. It definitely benefits from warmer serving temps as the chocolate notes have a tendency to disappear when it's too cold. Unfortunately the weather is pretty cold right now and so is my garage (where the kegerator is located). I think I'll probably end up bottling a lot of this and cellar it.

Update 4/21/14
I found out over the weekend that this beer placed first in the first round of the NHC (Denver) for category 21. I'm crossing my fingers that it does well in the finals. I think this really turned into a great beer after it got a little bit of age on it. As I mentioned before, the peppermint was a little strong when it was young but it developed nicely. This isn't a style I can drink pint after pint, but it's pretty delicious as a dessert beer.

Read more...

Smoked Robust Porter 2013

>> Sunday, November 03, 2013

Between some projects around the house and GABF, it feels like I haven't been able to brew is much as I'd like. I have five taps on the keezer now but almost none of them are the darker more flavorful types of beer that I associate with fall and winter weather. Porters are one of my favorite styles as are smoked beers, so today I'm brewing up a smoked robust porter. There's just something I love about the roasty character blended with a bit of smokey goodness.


I made a smoked porter last year that was supposed to be a clone of Alaskan Brewing Co.'s Smoked Porter. I home-smoked all the malt for that one and it turned out really well. This one is not quite as big of a beer, but it still fits within the style guidelines for a robust porter. This time I'm also using Briess Cherrywood Smoked Malt instead of home-smoked malt.  Here's the recipe as I'm making it:

3.5# Rarh Pale Malt
3.5# Crisp Maris Otter
1.5# Briess Cherrywood Smoked Malt
0.75# Briess Crystal 40L
0.75# Briess Crystal 80L
0.75# Briess Chocolate
0.75# Weyermann Munich II (Dark)
0.31# Briess Black Patent
28.3g Chinook (60 min)
28.3g Willamette (20 min)
1/2t Wyeast Yeast Nutrient
1/2 Whirlfloc
WLP001 California Ale Yeast in 1.2L starter

Mash at 155F for 60 minutes. 90 boil. Ferment at 62F 

Read more...

Oud Bruin Experiment 2013

>> Monday, October 07, 2013

I checked on my first Oud Bruin a few days ago. It has been aging for a little over a year and has a pretty mean looking pellicle since adding dregs from a Jolly Pumpkin La Roja. It's tart but the tartness is more subdued than any of my other sours, and I'd also say the flavor profile is more complex. Considering the looks of the pellicle, I think it will need to age at least through the winter before it's ready for packaging. I bottled Flanders #2 a while back, so I have a sour fermenter open and I thought I'd get started on another Oud Bruin.

The Oud Bruin I'm making today is an experimental one of sorts. The yeast I'm using for primary is Wyeast 3822-PC Belgian Dark Ale which is one I've never used before. Here are the yeast's vitals:

Beer Styles: Belgian Strong Dark and Golden Ales, Belgian Quadrupel, Oud Bruin/Flanders Brown, Fruit Beers, Belgian Specialty Beers
Profile: This unique Belgian ale yeast is a high acid producer with balanced ester and phenol production allowing a good expression of malt profile, especially the strong flavors of darker malts and sugars. High alcohol tolerance. Spicy, tart, and dry on the palate with a very complex finish.

Alc. Tolerance:  12% ABV
Flocculation: medium
Attenuation: 74-79%
Temp. Range: 65-80°F (18-27°C)

The fact that this yeast is a high acid producer is the reason I wanted to try it. Originally I was going to brew a  Belgian Dark Strong Ale with it, but eventually decided on brewing another Oud Bruin. I'm planning on primary fermentation with 3822, then pitching Roeselare in secondary for aging. I'm also using D-180 Belgian Dark Candi Syrup but I don't think I'll add this until I rack it to secondary for aging (never used this before either and I'm trying to ensure the bugs still have something to eat). This recipe will get aged hops which I prefer because they're very bug-friendly. Below is the grain bill for this recipe:

9.00 # 4 oz Dingemans Belgian Pilsner
1.00 # Weyermann Cara Munich III
0.75 # Castle Aromatic
0.50 # Dingemans Special B
0.13 # Briess Midnight Wheat
28.3g Aged Hops (60 min)
1/2 t Wyeast Yeast Nutrient
0.5 tabley Whirlfloc
Wyeast 3822-PC Belgian Dark Ale yeast in a 1.2L starter (primary)
16 oz D-180 Premium Extra Dark Belgian Candi Sugar (secondary)
Wyeast 3763 Roeselare Blend (secondary)

I did a step mash of 20 minutes at 150F followed by approx 35 minutes at 158F. I don't do many step mashes but I was trying to get some unfermentable sugars in this beer so that the bugs and brett in the Roeselare will have something to work with. 90 minute boil. Primary at 70F.

Brewing Notes
No real issues to speak of except for...I forgot to use my stainless scrubby filter over my pickup tube to filter out the aged whole hops. A couple times it almost clogged but it ended up working out ok. This brew is a beautiful brownish-red color. If it ends up tasting half as good as it looks, it should be a great beer.

Update 11/3/2013
I racked this to secondary yesterday and added the Roeselare and Extra Dark Belgian Candi sugar. This beer has some nice esters going on. The acid level is really low for a sour, but it's noticeable so it would be pretty high for a clean fermentation.

Update 1/7/2015
I pulled a sample today and I really like the way it's turned out. Tartness level is towards the high end of the style, but it's lower than the first Oud Bruin. I'm hoping to bottle it this weekend.

Read more...

Tart of Darkness - Barrel Project

>> Monday, September 30, 2013

Yesterday I brewed up what is intended to be a clone of The Bruery's Tart of Darkness. Tart of Darkness is a sour stout aged in oak barrels and from what I've heard it's delicious. I hoping I get a chance to try it this year at GABF.

A bunch of us from my brew club (ZZ Hops) had decided we wanted to do a club barrel project a little while back. A few weeks ago a friend of mine saw that Epic was retiring and selling off some of the barrels that were used to age their Imperial Stout.

These barrels have had a total of four fills; one with whiskey (I believe at High West), and three times at Epic. I don't expect to get any whiskey character, but we're hoping to pick up some oak character. We'll be doing a clean primary fermentation after which we'll combine all the beers in the barrel and pitch some brett and bugs, then let it age for anywhere from a few months to a year or so. Below is the recipe we settled on (adjusted for my system efficiency):

8# 6.9oz Rarh Pale Malt
14 oz Briess Crystal 60L
14 oz Flaked Oats (toasted for 45 min @ 350F)
6.7 oz Briess Roasted Barley
5.1 oz Briess Chocolate Malt
15.2g Saaz (60 min)
Wyeast 1028 London Ale in 1L starter
1/2t Wyeast Yeast Nutrient
1/2 Whirlfloc tablet

Mash at 158F for 60 min. 90 min boil. Ferment at 60F

Target O.G.: 1.065
IBU: 8

Brewing notes:
No real issues once I actually got to brewing. I recently changed my system startup process a bit. I used to heat my HLT and HEX separately but since upgrading from coolers to stainless kettles I've been recirculating water from HLT to HEX and back to HLT. The reason for this is due to the small volume, the HEX heats up very quickly by itself; I figured I might as well put it to use in heating the HLT. It's been working great except for today when I forgot to secure the return hose. At some point the hose slipped and the water from my HLT was pumped all over the floor of my garage. When the level got down to the element, it got hot enough to basically destroy itself. It served as a good reminder to pay attention and not leave equipment unattended. Anyway, I had to run to Home Depot and pick up a new element. All this set the start of my brew day back a few hours.

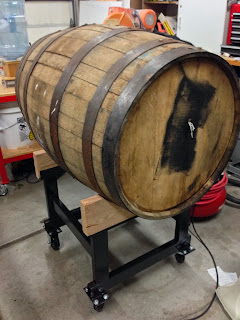
Here is a pic of the barrel as well as the cradle/cart that I made for the barrel. All in all we're into this a little over $100 for the barrel and the cradle. Not bad since we'll be splitting the costs between 11-ish people.

Update 11/10/2013
Last night was our barrel fill meeting. Other than taking a bit longer than expected to transfer, everything went well. It was interesting to taste the differences between the different batches. We ended up having two batches pitched with Roeselare in primary, and the rest had a clean primary. I can't wait until it's time to start pulling samples.

Read more...

Patersbier 2013

>> Saturday, August 24, 2013

Today I'm brewing a Patersbier, a Trappist style beer from the Belgian town of Malle. This style is a session ale brewed exclusively for the Cistercian monks...the Brothers' daily beer if you will.

A friend of mine brewed an extract version of this beer and won bronze in the Beehive Brew-off this year. It was very tasty...it reminded me a lot of a Saison, but very sessionable and with a lower ester profile. I'm going to keep a bottle, but most of this batch is going to celebrate some friends' wedding reception.

My recipe is based on the one from Northern Brewer but I did make a couple small changes. I added a little bit of Maris Otter for some additional complexity, and as usual I adjusted the recipe to account for my typical efficiency.

7.0 # Dingemans Belgian Pilsner
13 oz Crisp Maris Otter
28g (1.0 oz) German Traditional (60 min)
14g (0.5 oz) Saaz (60 min)
14g (0.5 oz) Saaz (10 min)
1/2 Whirlfloc tablet
1/2t Wyeast Yeast Nutrient
Wyeast 3787 Trappist High Gravity in 1L starter

Single infusion mash at 147F for 60 minutes. 90 minute boil. Start out fermentation at 64F and ramp it up a degree per day to 74F.

Brewing Notes
No issues during this brew session. I noticed the gravity starting to drop after running off about 5.75 gallons. This is when tannin extraction can occur, so I cut the sparge and topped off with a gallon of water from the HLT. My Beersmith pre-boil gravity estimate was 1.034 and I came in at 1.036 after topping off to 6.75 gallons.

Update 9/8/2013
This one is progressing along nicely. The 3787 yeast flocculates very well, so the brew has some great clarity even though there's some residual krausen on top. I'm going to transfer this to a keg later this week for conditioning, then I hope to bottle it by the end of the month.

Read more...

Eldon James Tubing Review

>> Monday, August 12, 2013


So today I'm doing a quick little write-up about tubing/hoses.  I was recently contacted by a representative at Eldon James Corporation (EJ) and was asked if I'd like to try out some of their high temp tubing.  This tubing has been used for years in the medical field and they recently realized it has homebrew applications as well.  I am a bit of a gadget and equipment geek, so I jumped at the chance to try it out during my most recent brew session.

First up, a little bit about my experience with different tubing.  When I first started brewing, I used basic high temp PVC tubing available at my local brew shop.  If I remember correctly, I believe it was rated for liquids up to 220F.  It worked ok but it would get cloudy after repeated use and had a tendency to deform over time.  It seemed like I'd end up replacing it a couple times a year.  A few years ago I switched to silicone tubing and I love it.  Silicone is a bit more expensive than vinyl tubing, but it's food-safe, doesn't impart any off-flavors and it lasts a long time as long as you don't abuse it. 

I use 1/2" thick-walled (1/8") silicone tubing to connect the various vessels on my HERMS system, and 3/8" thick-walled for racking from fermenter to keg, fermenter to bottling bucket, etc.  I like that it is capable of handling 400+F temperatures because it allows me to boil the hose to ensure it's as sanitary as possible.  With this method, I've even used the same silicone tube to transfer both sour and non-sour beers without any cross-contamination/infection issues.  My only complaint with silicone is it is somewhat soft and very pliable...this can be a pro as well as a con.  On the upside, it easily slips over hose barbs and bottling wands.  On the downside if you don't have your hoses routed well, silicone tubing can have a tendency to kink.

Depending on where I'm at in the brewing process, I use three or four hoses on my system.  I went ahead and swapped out one of the silicone hoses for the five foot sample of EJ's 1/2" Flexelene 135C tubing.  It's rated for temps up to 275F, so it's more than adequate for brewing.  It's also PVC-free, so it shouldn't impart any off-flavors.  

The first thing I noticed is EJ's tubing feels very similar to silicone; texture-wise, it definitely feels closer to silicone than the more plastic-like PVC tubing I used to use way back when.  Like silicone, it has a 1/8" wall thickness.  The most noticeable difference between the two is the EJ tubing seems much more rigid than silicone.  Rigid might not even be the right term because it's still flexible, but it seems more structurally sound in its flexibility and  seems that it would be much less likely to kink under the same conditions.  Like silicone, the EJ tubing slipped right over the 1/2" barbs on my Type C cam lock fittings.  Like with the silicone tubing, I used a simple zip tie to secure the cam lock fitting on the hose.  I was worried the EJ tubing might leak since it is not quite as soft, but even when running my March 809 pump with the output valve at full blast there were no signs of leaks. 

Appearance-wise the EJ tubing looks very similar to silicone.  It could be that my silicone tubing is a few years old (and has some staining from Iodophor) but the EJ tubing is noticeably clearer and more translucent.  It's never been much of a concern for me, but sometimes it can be harder to see lighter colored beers through the wall of the silicone tubing.  The EJ tubing is very clear in comparison, so even light American lagers can be seen through the wall of the tubing.

Deflection comparison between silicone (front) and EJ (back)
Performance-wise the EJ tubing worked great with no notable differences compared to silicone.  It basically performed as you'd expect a hose to perform.  When connecting/disconnecting hoses, you can feel the difference in the EJ tubing.  Visually you can see that it has a tendency to fall in a more gentle arc compared to silicone tubing.  It's still flexible enough that it can be easily routed around various brewing equipment and anything else that might be in the way on your brew stand.

Overall I'd say I was impressed with EJ's tubing.  Judging by the appearance and texture, I would have guessed that it was slightly more rigid, slightly more translucent form of silicone tubing.  If you currently use silicone and haven't had kinking issues, I don't see any reason to switch to the EJ tubing.  However, if you have a setup that is prone to kinking, I think it's definitely worth giving it a try.  I am interested to see how the EJ tubing performs long-term compared to silicone, so I plan to continue to use it on my setup.  I'll report back with any issues/differences I come across.  In the meantime, below are a few more pics.


Nice gentle arc off the mash tun


Installed on cam locks

EJ tubing (top) and silicone (bottom)
Update 11/29/2013
I've had a chance to use this tubing on quite a few batches now. The only complaint I have is it has a tendency to leak after a few batches. It's not horrible, but it would benefit from something more secure than zip ties. On the upside, it's maintaining its rigidity. 

Read more...

New Albion Ale

>> Sunday, August 11, 2013

Today I'm brewing a clone of New Albion Ale. New Albion Brewing Co. was founded in 1976 by Jack McAuliffe and is considered the first microbrewery of the modern era in the United States. New Albion was one of the first breweries to use Cascade hops...pretty much because that's all Jack could get a hold of and nobody else wanted them at the time. Sam Adams recently brewed and bottled a batch under Jack's supervision to honor him and his pioneering spirit in the world of craft beer.

We don't get many special releases from Sam Adams in Utah, so I figured my chances of finding this beer was pretty slim. Fortunately White Labs released the same yeast that Jack used for his beer and the recipe is readily available. This beer is what's known as a SMaSH beer, Single Malt and Single Hops, so the recipe is fairly simple. The result should be a flavorful session pale ale. I've adjusted the malt bill for my brewhouse efficiency (around 84%). Here's the recipe as I'm making it:

9# 3oz Briess Pale Malt
17g (.6oz) Cascade (60 min)
17g (.6oz) Cascade (30 min)
17g (.6oz) Cascade (15 min)
Whirlfloc (5 min)
.5t Yeast Nutrient
WLP076 Old Sonoma Ale Yeast in 1L starter

Mash at 148F. Ferment at 66F and let it rise to 68F.
Target OG = 1.055, FG = 1.011

Brewing Notes
Brew session went well. The only issue is I was updating my brew club's website and got distracted during the sparge so I ran off a little more than I'd intended. Efficiency still came in a hair over 83%, but I missed my target OG of 1.055 (came in at 1.049). As long as I didn't extract any tannins from the extended sparge, it should still be a tasty beer. 

Update 8/12/2013
Not brewing for a couple months had me out of practice. I ran the wort through the chiller a little too quick and only got it down to 80F. I left it in the ferm chamber overnight and pitched the yeast this morning after the temp had dropped to 66F.

Update 9/8/2013
I kegged this one today. It came in around 5.3%. Also treated it with some gelatin for additional clarity.

Read more...

New Keezer Finished!

>> Monday, August 05, 2013

I haven't brewed for what seems like months, but I have a good excuse...I've been working on my new keezer. For anyone unfamiliar with the term, a keezer is a freezer-based draft beer setup (typically chest freezer); like a kegerator is a refrigerator-based draft beer setup.

There are lots of different keezer examples out there but they tend to fall into two primary styles:
  1. Collar-mounted taps - A collar of some sort is sandwiched between the freezer lid and freezer body. Holes are drilled for mounting the taps through the collar and a drip tray is attached to the front of the keezer.
  2. Tower/Coffin mounted taps - Collars are sometimes but not always used in this kind of setup; it usually depends on how much clearance is needed inside the keezer. The original lid may be used but oftentimes a new lid is fabricated. A tower/coffin is mounted to the lid and the taps are mounted in the tower/coffin.
I went with the tower/coffin style setup and I'm using a collar so that I have enough clearance to fit two kegs on the hump and eventually upgrade from three to five taps. I didn't document things step by step, but here's some basic info.

Most of the wood is 3/4" poplar. The backsplash and top use 1/2" plywood with 1/4" cement backerboard set in thinset and then fastened to the plywood with screws. The cement backerboard should provide a stable substructure for the tile. The tile is glass mosaic and will hopefully be easy to clean if there are any spills.

The coffin and top were assembled with an assortment of biscuit joints, pocket screws, and wood glue...I think I could park my truck on it and it wouldn't break. I also made a dado cut on the lid trim pieces.  These fit snugly over the edge of the plywood lid and should help prevent sagging/warping with the lid. Also mounted on the lid is a 4" x 19" stainless drip tray from Update International (part # DTS-419). It's not quite as nice or heavy duty as my old wall-mount drip tray, but it's good enough.

I welded a very basic cart so the keezer can be easily moved when needed. It's constructed of 14 gauge 1"x2" rectangular steel tubing and 1.5" square steel tubing. I haven't done it yet, but my plan is to attach the keezer to the cart by sheetmetal screws that screw into the "feet" of the freezer.

Inside the keezer is a gas manifold, a tower blower/cooler, and the temp probe is immersed in a re-purposed White Labs vial filled with water. 

The gas manifold is made from a mix of brass fittings courtesy of Harbor Freight and Lowes. As with the previous kegerator, I chose to have the CO2 tank outside the keezer. The reason for this is it seems to work better on the outside (more consistent PSI) and I needed the extra room if I ever manage to upgrade to five taps. 

The tower blower/cooler helps recirc the air which helps avoid temperature stratification inside the freezer (thus helping to eliminate foamy pours from a warm tower/coffin). The cooler/blower design is based on this one. I might add a switch later on, but right now the blower is powered on whenever the freezer is plugged in. 

The temperature controller is a Willhi WH7016C controller which is similar to the STC-1000 controller that a lot of homebrewers are aware of ("eBay temp controller"). The main difference is it's a single stage controller rather than dual stage (heating or cooling rather than heating and cooling). It also displays the temp in Fahrenheit rather than Celsius which is nice for those of us in the US. I made a mounting panel out of some scrap sheetmetal I had and attached it to where the original thermostat was mounted. This controller includes a 30 amp relay, more than enough to handle the five amp draw of the freezer. I also added an 80mm fan that blows on the freezer compressor whenever the freezer kicks on; maybe not necessary but it was cheap and it might help extend the life of the compressor.

The faucets are VentMatics which were on my original kegerator. Shanks vary in length from 3" to 5", some with the integrated nipple and some with a detachable tail piece. These are also from the old kegerator but I can't remember why I didn't buy all 3" ones.

Here are a few random pictures of the keezer. through various stages of the build. Hopefully these will help illustrate how I put things together and may help inspire others that are considering tackling a project like this. This was a fun project, but I'm really looking forward to brewing another batch. On deck is a New Albion clone.

After initial assembly
Operational and waiting for tile
Five kegs, blower hose (middle) and gas manifold (right)
Dry fitting the tile
Bottle opener for...well, bottles
Temp controller replaced original thermostat

Read more...

My 2013 Beehive Brew-Off Results

This past weekend was the 5th Annual Beehive Brew-off. I volunteered to judge both days this year and had a chance to try some fantastic beers. I also got to meet and talk with homebrew celebrities James Spencer and Steve Wilkes of Basic Brewing Radio.

Judging this comp was a great experience. On Saturday I got to judge category 15 German Wheat and Rye Beers and category 21 Spice/Herb/Vegetable Beers. On Sunday I judged category 22 Smoke-Flavored and Wood-Aged Beers. One tip I have for anyone entering categories that cross traditional styles 21, 22, 23 (Specialty Beer), etc. is to provide as much detail about your beer as possible. For example, I'd recommend always specifying the base beer in addition to details about process/ingredients that made you enter a beer in one of these categories. I've been guilty of this too, but don't put it on the judges to try to figure out where you were trying to go with a beer. Also, if you call out a certain ingredient, make sure it's identifiable in the finished beer. For example, if you were entering a Pineapple Saison in the Fruit Beer category but there isn't any hint of pineapple in the aroma or flavor, you might want to consider a different category.

I had five entries this year. Based on my personal preferences, I ranked my entries from strongest to weakest as follows:
  1. Berliner Weiss (17A)
  2. Flanders Red (17B)
  3. Tie between Brett Saison (16E) and Belgian Red (20A)
  4. Saison 2013 (16C) 
Only one entry placed, but the rest received fairly good scores and had pretty good comments. Here are the judges' scores in red, an overview of the judges' comments in grey, followed by my comments in blue.

Scoring Guide
Outstanding - (45 - 50) - World-class example of style.
Excellent - (38 - 44) - Exemplifies style well, requires minor fine-tuning.
Very Good - (30 - 37) - Generally within style parameters, some minor flaws.
Good - (21 - 29) - Misses the mark on style and/or minor flaws.
Fair - (14 - 20) - Off flavors, aromas or major style deficiencies. Unpleasant.
Problematic - (0 - 13) - Major off flavors and aromas dominate. Hard to drink.
  • Berliner Weisse 2013 - 35, 34, 36; Judge A - <every other word is illegible>. Judge B - Nice dry sour. Perhaps slightly a bit too sour that slightly covers up the wheaty breadiness. Judge C - Quite nice. The sourness is near high threshold. Nice natural fruitiness. Watch the sourness. It's near lambic territory. Not bad comments. This beer is very acidic, but that's what I was shooting for. In my opinion, it's a very different sourness than a lambic. We all have our own preferences, but I don't plan on changing much on this one.
  • Flanders Red #1 - 31, 30, 33; Judge A - Malt and fruitiness seem lacking. Sourness dominates palate. Could be better balanced. Judge B - Sourness overpowers everything else. Hard to taste malty richness but some evidence exists. Judge C - Fruity/sour/barnyard. Nice example of style. Improvement on head/increasing non-fermentables maybe. I agree this one is very sour and the malt character is a bit low. However, as to fruitiness, this beer screams pie cherries. I really like this beer, but I also really like bold flavors in food and beer. From a competition perspective, this beer would probably do better if it was blended with a younger less sour version. Also, this one is under-carbonated. In the mouthfeel section, the judges commented that it had medium carbonation. Honestly, I'd be surprised if there was more than 1.0 volume CO2, so I'm surprised they didn't catch that.
  • Saison 2013 - 32, 29; Judge A - Very tasty beer. Would have another. Maybe clean up astringent issues and age on yeast longer. Judge B - While some sourness is appropriate, the sourness here tends to slightly dominate more phenolic flavors. I thought this was a good saison, but it wasn't a standout. So going in I wasn't expecting it to do all that great. I think it's kind of funny that the one judge recommended aging on the yeast longer. This one spent a lot more time on the yeast than I'd planned. 
  • Belgian Red -35, 32Judge A - This is a drinkable beer. I would like a little more cherry. Carbonation might be a little high but ok for style. Judge B - Nice drinkable beer. True to style. This beer ended up winning the gold medal in the Fruit Beer category. I thought it was a great beer, but honestly I thought my Berliner Weisse was a stronger entry. I agree, it's very drinkable and the tartness from the cherries makes it very refreshing. This is my first win in a comp other than club-only comps, so I'm pretty excited about it. I was torn on which category to enter this in and at the last minute I switched it to Fruit Beer. 
  • Brett Brux Trois Saison - 38, 37, 36; Judge A - This is a very good drinkable beer. Overall balanced. Loved this beer. Judge B - Good drinkable beer. High in carbonation. Judge C - Dry, light, "champagne" beer with some Belgian character. I was pleased with the scores on this one but a little bummed it didn't place. A few of my brew club buddies have absolutely fallen in love with this beer. It's developed some great brett character over the past year. My only knock against it is some of the peppery/spicy notes have mellowed with time, so in one sense it's lost some complexity, but in another it's added complexity with the brett character. It's one of my favs and I'll definitely be making this one again.

Read more...

Turbodog 2.0

>> Sunday, June 09, 2013

Today I'm brewing my second attempt at Abita's Turbodog. I brewed a version of this three years ago. It turned out well but I wouldn't call it an exact clone. That recipe was from BYO Magazine's 150 Clone Recipes issue; this time it's based on CYBI's recipe. The recipes are similar and I think the biggest difference is in the late Willamette additions. I'm not sure of the source for the BYO recipe, but I know the CYBI recipe is based on interviewing the brewer at Abita, so hopefully this batch will turn out closer.

I modified the CYBI recipe for my system efficiency and also had to substitute Magnum for the Apollo hops that the recipe called for. Here's the recipe as I made it:

9# 1 oz Briess 2-row Malt
10 oz Briess Crystal 90 Malt
7 oz Crisp Chocolate Malt
.53 oz (15g) Magnum Hops (60 min) *sub'd for 12g of Apollo*
.18 oz (5g) Willamette (30 min)
.11 oz (3g) Willamette (10 min)
.5 Whirlfloc (10 min)
.5 t Wyeast Yeast Nutrient
Wyeast 1007 German Ale Yeast in 1L starter

Mash at 152F for 60 min. 90 minute boil. Ferment at 60F

Brewing Notes
No issues on this batch. I got started a little later in the day than I'd hoped. The reason for this was I forgot to run to my LHBS yesterday because I was working on my keezer that is replacing my kegerator. On a related note, I set up the old kegerator as my new fermentation chamber. This will be the first brew in the new chamber.
Kegerator turned fermentation chamber
Update 6/10/2012
The new ferm chamber seems to be working well. There are some pros and cons to both styles (fridge vs. freezer) but I think it's going to work well. I left it in overnight to chill from 72F down to 60F and pitched the yeast this morning.

Update 6/14/2013
This one is still happily chugging along. 60F is pretty low for an ale, so I was thinking this one might take a few days longer than a typical ale. The ferm chamber is working well; it's holding temp and not kicking on too often. I added a five gallon bucket filled with water to increase the thermal mass. That should help keep temps stable when curious himebrewers open the door to take a peek.

Update 9/8/2013
I put this one on tap about a week ago. We did a side by side comparison between my kegged homebrew version and a bottle of the commercial version. The color was pretty much identical. Flavor and aroma ended up being not so close, but in this case it was a good thing. The commercial version had some oxidized character going on, so unfortunately I think I got a hold of a bad bottle. The good news is I think my version turned out really well.  

Read more...

Wisconsin Belgian Red - New Glarus

>> Monday, May 27, 2013

Today is Memorial Day and I'm brewing a clone of Wisconsin Belgian Red from New Glarus Brewing. I've never had the commercial brew but I have had some of their other beers and they are pretty amazing. I know not everyone likes fruit beers, but New Glarus does them right.

My recipe is based on the one that appeared in the July-August 2007 issue of Zymurgy magazine. I'm using a combination of tart cherries and Trader Joe's Cherry Juice instead of the Knudsen's Tart Cherry Juice. I also opted to use Belgian Pilsner malt. Here's the recipe as I'm making it:

5.0 # Dingemans' Belgian Pilsner
2.0 # Weyermann's White Wheat Malt
6.0 oz Crystal 40L
0.5 oz Roasted Barley
28.3g Aged Hops (60 min)
Wyeast 3942 Belgian Wheat Yeast in 1L starter
0.25 oz American Oak cubes soaked in Pinot grigio (secondary)
1 gallon Trader Joe's Cherry Juice (secondary)
4.0 # Tart Cherries (secondary)

Mash at 156F for 60 min. Collect 5 gallons. 60 min boil. Ferment at 65F

Brewing Notes:
Everything went well during the brew session. However, after racking to the fermenter I realized my fermentation chamber wasn't cooling. The compressor is running but no chilling, so it's not looking good. This brew is going to have to ferment at room temp...no bueno. On the bright side, some friends recently gave us an old upright freezer so my wife said I could turn our old chest freezer into a keezer. I wasn't in any hurry to do so but since the ferm chamber just died and summer right around the corner, I'll need to figure something out. I think I'll probably proceed with the keezer plans and turn my old kegerator into a fermentation chamber. Anyway, this is a really pretty orange-red brew right now. I imagine it's going to be a really deep red after adding the cherries/cherry juice. Here are a couple pics from the brew session.
Just starting to sparge
First runnings
Update 6/1/2013
Fermentation was extremely active the first few days then dropped off significantly. I think this is the first time I've used this yeast and it seems to be very aggressive.  I went ahead and racked the beer to secondary on top of the Trader Joe's Cherry Juice and four pounds of tart cherries; this thing is going to be a cherry bomb. I don't usually do much to prep my fruit. However, I'm pretty sure the peach/apricot wheat beer I made last summer picked up some bacteria and wild yeast. So in order to avoid a repeat I decided to play it safe this time and heat the tart cherries to 160F to pasteurize. Prior to racking to secondary, the krausen completely dropped. A couple hours after racking I have an inch of krausen again.

Update 6/3/2013
I forgot to add the oak on 6/1/2013 so I added it yesterday. Here are a couple more pics.

Update 6/14/2013
I kegged this brew today. two weeks might seem a little soon for a Belgian style beer on cherries, but keep in mind there aren't any brett or bugs in this brew that would benefit from an extended feeding time. I tasted a sample and it's delicious. I can't wait for this to carb up.

Update 8/5/2013
This beer turned out great and I'm pleased to say it took gold in the Fruit Beer category at the 5th Annual Beehive Brew-off yesterday. 

Read more...

Smoked Beef Brisket


A couple hours in
I picked up a brisket a couple weeks ago and was planning on curing it and making pastrami. After realizing I didn't have all the necessary spices on hand I decided to go ahead and smoke it for some Texas-style Smoked Brisket. Cooking brisket is kind of tricky and it's really easy to screw it up. Of all the times I've made it, I think the first time was the best (beginner's luck).

I started with a 5.5# beef brisket from Costco. A couple days ago I applied a generous amount of Rudy's Rub (a buddy of mine used to live in Texas and was nice enough to bring me some). This morning I pulled the brisket out of the fridge and added a little more rub. I gave it about an hour to warm up a bit then threw it in the smoker (fat side up) with a combination of about 30% hickory and 70% mesquite. I smoked it for about four hours (right about 200F) then transferred it to a stainless steel pan and cooked it in my oven at 200F for another four hours, then at 250F until the internal temp was about 215F (about an hour). I let it rest for about 20 minutes then cut slices across the grain. This one turned out amazing; I think even better than my very first one.  It's fork tender and still very juicy.
Nice smoke ring


Read more...

Big Brew Day 2013 - Hop Stoopid IPA

>> Monday, May 06, 2013

Saturday was National Homebrew Day and in celebration we hosted a Big Brew Day event. We brewed two batches, an extract-based Nut Brown Ale and an IPA based on Lagunitas Brewing's Hop Stoopid. As for the Hop Stoopid clone, I'm pretty sure this is the most hops I've used in a single recipe...definitely the most whole hops ever used.

This recipe is based on the Brewing Network's CYBI recipe adjusted for my system efficiency. I also changed the flameout and dry hop additions a bit in order to perform a hop stand. I've never tried doing a hop stand before, but the basic idea is to kill the flame, add your hops and let them steep for an extended period of time (probably minimum of 20-30 minutes) before chilling. When I first read about this technique it surprised me because of my experience with a hop back where the thought is you chill ASAP in order to lock in the hop flavor/aroma. Then I saw some posts on Homebrewtalk where other brewers claimed they made their best ever IPA's when doing hop stands, so I figured I'd give it a try. Here's a link to a BYO Magazine article on the subject.

Below is the recipe as we made it.

11# 10.6 oz Briess Pale Malt
6.4 oz Briess Victory Malt
71g Columbus (90 min)
33g Cascade (12 min)
33g Chinook (12 min)
56g Simcoe (Hop stand)
44g Columbus (Hop stand)
11g Chinook (Hop stand)
1/2 Whirlfloc
1/2 t Wyeast Yeast Nutrient
White Labs WLP002 English Ale in a 1.4L starter
56g Simcoe (Dry hop)
44g Columbus (Dry hop)
11g Chinook (Dry hop)

Mash at 152F for 60 min. 90 min boil. Ferment at 65F, raising to 67F over a few days.

Brewing Notes
Brew session went well. Big Brew Days are fun but there's also a lot going on so we had one minor hiccup...I forgot to check the post-boil gravity. I did remember to check the pre-boil gravity; it came in at 1.055, just one point higher than the Brewsmith prediction of 1.054. We used about 40% RO water and 60% filtered tap water.

Update 5/6/2013
This brew smells incredible. So far I'm very happy with the results from the hop stand. I had to remove the lid this morning because the krausen was starting to push up through the airlock. With both batches of beer in my ferm chamber, there isn't enough room for a blow-off tube and another container.

Update 5/18/2013
Dropped in the dry hops today.

Update 5/26/2013
This brew got kegged today. Very fragrant and dropped very clear. Can't wait to give this one a try.

Read more...

Berliner Weisse 4/2013

>> Sunday, April 14, 2013

24 hours after pitching lacto
Time for yet another sour beer; next weekend I'll be brewing a Berliner Weisse. I finished brewing my Saison a couple hours ago, so now I'm kicking off the lactobacillus starter.

I tried making a Berliner Weisse a few years ago. It wasn't bad but it wasn't all that great either. The level of tartness/sourness was much lower than I was shooting for. It really ended up tasting like a bland low ABV wheat beer with a slight "Belgian" character.

This style should be noticeably tart with a fairly intense sourness. I've heard stories of people visiting Germany and ordering a straight Berliner Weisse (minus the traditional Woodruff or Raspberry syrup) and the waiters refusing to serve them. My goal is to make it sour enough to make a German waiter want to shake his head at the silly Americans.

I did a little more research for this recipe including studying various other recipes and reviewing an NHC presentation on how to brew this style. Traditionally, Berliner Weisse's use a no-boil method. I don't like the idea of potential unknowns making their way into my fermenter, so I'll be using a short-boil (15 min) method. My plan is to use the following process:

  1. I'll be using 1/2 carbon filtered tap water and 1/2 RO water. This should help prevent any weird mineral/lactic acid flavors.
  2. Seven days prior to brew day, add one packet of Wyeast 5335 Lactobacillus to 1L of 1.020 starter wort. Do not aerate! No stir plate! In fact, if possible, purge your starter container with CO2. Keep warm, preferably between 80-90F for a week.
  3. On brew day after cooling wort, pitch  the 5335 starter and allow it to ferment for one week at 68F. Again, do not aerate!
  4. After one week, add Wyeast 3191 Berliner Weisse blend and continue to ferment at 68F until finished.
The grain bill on this style is pretty simple and typically consists of only base malt and wheat malt. Gravity is also low; this is a light, spritzy, and refreshing style. I prefer to use aged hops in my sours as bitterness from hops can really clash with the sourness from the acid-producing bacteria. Below is the grain bill along with some additional process info.

3.75 # Belgian Pilsner Malt
3.00 # Weyermann Pale Wheat Malt
1.0 oz Aged Debittered Hops (Mash hops, 0.0 IBU's)
1 package Wyeast 5335 Lactobacillus in 1L starter
1 package Wyeast 3191 Berliner Weisse Blend

Mash at 150F for 90 minutes. Mashout at 168F. 
Collect 5.5 gallons and boil for 15 min. Chill to 68F and pitch 5335. Ferment at 68F for 7 days before pitching 3191.

Brewing Notes 4/21/2013
Brew session went well with no issues. The 5335 Lactobacillus was pitched and will get a 7 day head start on the 3191 Berliner Weisse yeast blend. I tasted a small sample of the starter wort and it had a nice lemony tartness, so I think we're headed in the right direction. My ferm chamber still has my Saison in it so this one is fermenting in my basement which is pretty close to 68F.

Update 4/28/2013
I pitched the 3191 Berliner Weisse Blend today. The krausen from the lacto has dropped from a couple inches to about a quarter inch.

Update 5/6/2013
I pulled a sample today to get a gravity reading and do a little taste test. There's a bit of brett character in the nose...more than I expected considering it's only been in there for a week. More dominant than the brett is the lacto character. This brew has some absolutely fantastic tartness especially considering it was just brewed back on 4/21/2013. It's not as intense as my Flanders Reds but it's definitely noticeable. The flavor reminds me a lot of lemonade, but unsweetened. Even my wife who isn't a real big sour fan said she really liked it. Starting gravity on this batch was 9.8P (1.040) and it's currently at 5.8P (1.014) with an ABV of 3.32%. One thing really surprised me was the clarity of this brew. The recipe wasn't quite 50/50, but there was a lot of wheat malt in it so I was expecting it to be hazy. As you can see below, it's awfully bright for such a young wheat beer.
Berliner Weiss at 15 days old

Update 5/18/2013
Pulled another sample today. Gravity has dropped to 5P (1.009). I'm really happy with the level of tartness; this attempt is so much better than the first one. It looks like a hint of a pellicle is starting to form. I'm trying to decide whether to bottle it soon and let it age in the bottle for a bit or let it age in the fermenter. I'm leaning towards giving it another week in the fermenter then bottling.

Update 5/21/2013
I was in my basement this morning for a call with an offshore team from work and peaked in on the Berliner Weisse. This batch definitely has a dusty lacto pellicle forming. I may have to give it a bit longer than a week longer in the fermenter. I hope my most recent Saison finishes soon because I'm running short on fermenters.

Update 5/29/2013
I bottled this one last night. It's very drinkable right now but I'm going to try to let it go at least a month in the bottle before I serving them.

Update 7/1/2013
Not to toot my own horn, but this beer has turned out better than I could have imagined. I recently took some to the Big Ass Summer Solstice Beer Pow-wow and it seemed to be very well received. It has some great tartness going on and a very nice wheaty/bready finish. It's dry, light, and refreshing like a Berliner should be. I don't think there's anything I'd change the next time I brew it. This beer will absolutely make it into my regular rotation. 

Read more...

Saison 4/2013

First runnings
Today I'm brewing another Saison. I'm excited about this one because it uses a few ingredients I haven't used. First up is Golden Naked Oats which are described as follows:
This unique product is a huskless oat crystal malt. It has a special sweet berry-nut flavor and will add a deep golden color with light caramel flavors to the finished beer. The usage rate is 4-15% of the grain bill.
I'm also using Grains of Paradise or Paradise Seeds in this brew. They are described as:
These small seeds look like cardamom, but have their own unique character. The spice is native to West Africa and during medieval times it was used to flavor food. It has also been used as a pepper substitute. While it does have a peppery zing, paradise seeds also have notes of citrus and an earthy pine aroma.
Lastly, I'll be using Wyeast 3724 Belgian Saison yeast. This yeast has a reputation for stalling out a little early, but with proper temperature control it will usually start back up after a short pause. It is described as:
Classic farmhouse ale yeast.  Spicy, complex aromatics including bubble gum.  Tart and dry on the palate with mild fruitiness.  Finishes crisp and mildly acidic.  Ferment at warm temperature.  May have vigorous fermentation start.
My last three Saisons were pushing the ABV limits for the style (9+%), so the goal with this one is to come in closer to 6.5%. The grain bill and procedure are as follows:

8.25 # Dingemans Belgian Pilsner Malt
10 oz Weyermann Acid Malt
10 oz Castle Aromatic Malt
10 oz Simpson Golden Naked Oats
0.46 oz (13g) CTZ Hops (FWH)
12 oz Amber Candi Sugar (15 min)
2 g Grains of Paradise (5 min)
1.75 oz (49.6g) Styrian Goldings (0 min)
Wyeast 3724 Belgian Saison in 1L starter
Whirlfloc
Wyeast Yeast Nutrient

Mash at 148F for 75 minutes. Mash out at 168F. 90 minute boil. Start Fermentation at 70F then ramp up to 92F over a few days. If fermentation stalls, maintain temp around 92F.

Brewing Notes
Everything went well. The only problem was I was shooting for an OG of 1.056 but ended up with 1.067. The color on this brew was awesome going into the boil kettle.

Update 4/24/2013
Sure enough, the 3724 yeast seems to have stalled out at 1.034. I gently roused the yeast today and I'm continuing to hold it at 92F. I'll probably check the gravity again over the weekend to see where it's at.

Update 5/6/2013
I had to move this out of the ferm chamber to make room for the Hop Stoopid IPA. The Saison definitely wasn't finished, but sometimes you gots to make room. I'll probably let this go another week or so and check the gravity again. If it's still not done, I'll probably add some WLP001 or maybe Wyeast 3711.

Update 5/18/2013
As I mentioned in the previous update, this one has been chilling in my basement. There's still a ton of yeast in suspension and it looks like fermentation has restarted. I think I'll move this back into the fermenter (and bump the temp back up) in about a week to try to get this to finish.

Update 5/29/2013
The freezer I use for my ferm chamber appears to have died. The good news is it still works for heating, so this Saison is back in the ferm chamber at 92F.

Update 6/3/2013
I checked the gravity today and it's down to 7.6P (1.008).

Update 6/9/2013
This got kegged today. It finished out at 7.4P (1.007). I'm glad that fermentation picked back up and I didn't have to add a different strain. This one will be conditioning in the house for a few weeks until I get a chance to finish the new keezer.

Read more...